Making Get to the CHOPPER
Yesterday I uploaded a video from back in October 2015, where Niqui and I surprised our guests that were visiting with a helicopter tour around our lovely island, Grand Cayman.
The video itself was shot on 3 cameras – a GoPro 3 HERO Black, my trusty iPhone 6s Plus with an Olloclip and Niqui’s iPhone 6s. The footage looked good but unless you’re well known with the island its not that easy to figure out where we are at any given point in time.
Luckily Chris was wearing his new Ambit and tracked our flight path. This is exactly what I needed.
The flight path
The idea was to show the map of the flight path with the image of a chopper showing our current position in the lower-right hand corner as the video played.
Enter Motion.
I’m very much a Motion newbie — I’ve used it a couple times with results I’m mostly happy with, but still look quite amateurish. Maybe that’s part of the charm.
Initially I was thinking maybe I could get the flight-path file and parse the GPS coordinates and build something automatically. Turns out its a lot easier to trace the path instead.
I used the flight-path image from Chris as a base and used the bezier tool to trace the path. Once I was happy with that I launched Google Earth, zoomed in to the island to find the right location and took a screenshot. This was the background.
The background
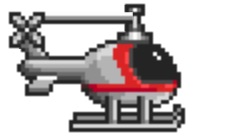
Next I needed a helicopter. Found this lovely, 1987 model from a TurboGrafx-16 game called J.J. & Jeff.
Chopper
Perfect.
Motion has a built in behavior called “Motion Path” which I applied to the image. Motion now asked me to draw the path. I’d already done this once so didn’t really feel like doing it again. Much searching later I found that the motion path’s “Path Shape” property was set to the default, “Open Spline”.
"Open Spline", you're not the one that I want
Changing this to “Geometry” allowed me to provide my existing, traced path as the “Shape Source”. Perfect! I now had my helicopter image moving along the path which was exactly what I was looking for.
There are a few times where the helicopter changed direction and it looked a bit weird for the chopper to fly backwards. Ok, we need a horizontal flip. But there is no way to flip horizontally.
I thought maybe I could set up a keyframe and swap the image with one that was pre-flipped, but that seemed wrong.
Much DuckDuckGo’ing later I found that setting the “Scale X” property to -100% means the same thing as “flip horizontally”. Cool.
Export the movie and we’re done.
Nearly. That looks good, but its a bit boring. It would be much cooler if the helicopter was animated.
I opened up the original image in Pixelmator and copied pixels until I had three states: left blade, both blades with rotated rotor, right blade.
Layers of pixels
Chopped chopper. By no means perfect, but good enough
I couldn’t figure out how to animate all of these together so I created another Motion project which lasted 3 seconds, with each of the states above lasting 1 second. Looking back now I should have made it 3 frames instead.
I exported this as a QuickTime movie ensuring that I set “Color+Alpha” in the Render options and set the project background to be transparent.
Export settings
No matter what I tried, when I imported this into the main Motion project it wasn’t transparent. I searched and searched but found no solution so in the end I made the background a bright green and used the Keyer filter to get rid of it — that worked like a charm out of the box.
Well mostly. On a certain part of the video the animated chopper had a visible left border.
An annoying visible border
To get rid of that I set the Matte Tools’ “Shrink/Expand” to -4.
Matte Tools > Shrink/Expand
This got rid of the border but now the chopper looked a bit thin. Nothing a good dose of drop shadow can’t fix.
Border be gone!
Looking good. To speed up the slow, 3-second animation I set the timing to 800%. And we’re done!
I exported the movie and brought it into Final Cut Pro X where I scaled it down to 25% and put it in the lower-right corner. At that size it was pretty hard to see the chopper, so back in Motion I scaled the animated chopper up to 200% and also added a Sharpen filter.
Finally, I made the clip as long as the edited shots to make syncing up a little easier and to keep the blades animating at full speed. Otherwise it would have looked odd because I’d have to stretch the 10 seconds out to 3 minutes. Now its actually done.
Back in FCPX land the rest of the video was put together. It was basically two multi-cam clips but of course I hadn’t considered how we were going to sync up the video shot on different cameras. Luckily FCPX can sync up video from multiple sources based on their audio signature. That’s some serious magic.
Color grading was done in ColorFinale which is my new favorite tool for this.
And that's it. It was a hell of a lot of fun making it — I certainly learned a lot, though the most fun, the most fun was definitely being on that chopper.


